Category: Email

Email setup on iOS Devices

How to configure your iOS device

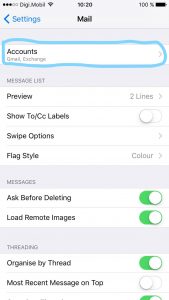
  • Tap Settings
  • Tap Mail, Contacts, Calendars


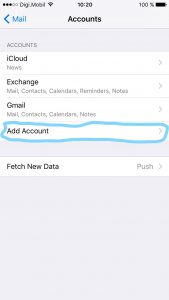
  • Tap Add Account

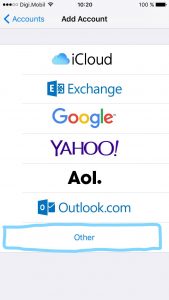
  • Choose Other

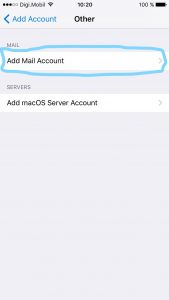
  • Choose Add Mail Account


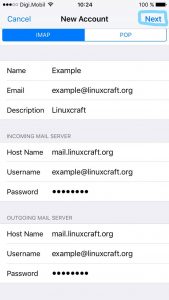
New Account Information

  1. Enter your Name
  2. Enter your email address as the Address
  3. Enter the password for your email address
  4. Tap Next


Incoming Mail Server

  • Host Name: This is typically your domain name preceded by “mail.”. This can be found in the E-mail Accounts section of the cPanel, under More > Configure Mail Client.
  • User Name: Your email address.
  • Password: The password for your email address.

Outgoing Mail Server

Although iOS may indicate these fields as optional, please enter your full email address and password


  • Host Name: This is the same as the incoming server.
  • User Name: This is required and again is your email address.
  • Password: The password for your email address.
  • Tap Next.


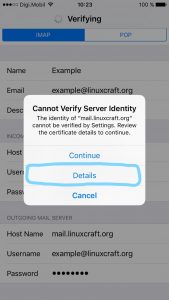
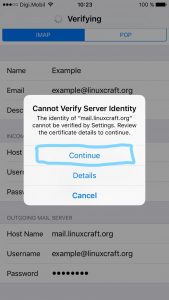
Cannot Verify Server Identity

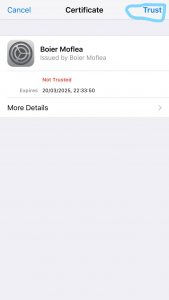
This error message occurs because the certificate is for *.hostbase.net not your domain. Click continue to accept the certificate.

Mail and Notes

The final screen will ask if you want mail and notes turned on for this account. Leave them both on and tap Save.

  1. Leave Mail and Notes set to on.
  2. Tap Save.
Click to rate this post!
[Total: 0 Average: 0]

sendmail clear mailque

#!/usr/bin/env bash

cd mqueue-client

deleted=0

for i in `ls`
do
rm -f $i
percentage=$(bc <<< “scale=2; ($deleted / 1035435) * 100”)
((deleted++))

echo “Deleted $i. Files deleted $deleted. $percentage% complete.”
done

Click to rate this post!
[Total: 0 Average: 0]

Exim commands

Useful exim commands:

exim -M id      #Try to send the message with id id
exim -qf       #Tell exim to process the entire queue again
exim -qff      #same as qf, but it will flush the frozen messages
exim -Mvl id    #view the message log for message id
exim -Mvh id    #view message id‘s headers
exim -Mvb id    #view message id‘s body
exim -Mrm id    #remove message id from the queue
exim -Mg id     #fail and send a bounce to the sender
exim -bp | exiqsumm    #Print summary of the messages in the queue
exiwhat        #show what exim is doing right now
exim -bpc      #show number of messages in the queue
exim -bp       #print list of messages in the queue

exim -bP | grep message_size_limit

exiqgrep -z -i | xargs exim -Mrm // Remove all frozen messages

exiqgrep -i -f [email protected] | xargs exim -Mf // Freeze all queued mail from a given sender

exiqgrep -i -f ‘<[email protected]>’ | xargs exim -Mrm // remove all mails from user [email protected]

exim -bp | grep “[email protected]” | awk ‘{print $3}’ | xargs exim -Mrm


Exim_remove script to clear queue:

/root/exim_remove

Usage: /root/exim_remove [-r] [-sb <PATTERN> | -sh <PATTERN>] [-i] [-f] [-s]

-r: remove the emails from queue not just list info

-sb: search email’s body in the exim queue for PATTERN

-sh: search email’s header in the exim queue for PATTERN

-i: treat PATTERN as case insensitive

-f: search for the frozen emails in the exim queue

-s: generate mail queue stats

The manual way to remove the entire queue is as follows

cd /var/spool
mv exim exim.old
mkdir -p exim/input
mkdir -p exim/msglog
mkdir -p exim/db
chown -R mail:mail exim

Click to rate this post!
[Total: 0 Average: 0]

Activare “My outgoing server (SMTP) requires authentication.” in functie de clientul de email utilizat

Microsoft Outlook Express and Outlook 2000

1.) Click Tools

2.) Click Accounts

3.) Click the Mail tab

4.) Double-click on the BlueTie account

5.) Verify that the email address is entered in all lowercase letters (General Tab)

6.) Click the Servers tab.

7.) Verify that “Server Requires Authentication” is checked

8.) Click the Settings button and verify that “Login using same settings as my incoming mail server” is selected

9.) Click ‘Apply’ (if available), then ‘OK’, and then ‘Close’.

Microsoft Outlook 2002 (XP) and 2003

1.) Click Tools

2.) Click Email Accounts

3.) Click View or Change Existing Email Accounts

4.) Click Next

5.) Double-click on the BlueTie account

6.) Click on More Settings and then click the Outgoing Server tab.

7.) Verify that “SMTP server requires authentication” is checked and “Use same settings as my incoming mail server is selected”

8.) Click ‘OK’, then ‘Next’, and then ‘Finish’

9.) Click send / receive to check for errors

Mozilla Thunderbird

1.) Click Tools

2.) Click Account Settings

3.) Click Outgoing Server from the left

4.) Select the BlueTie outgoing server

5.) Click the Edit button

6.) Verify that Use Name and Password is checked

7.) Verify the username is entered correctly

Apple Mail

1.) Click Mail

2.) Click Preferences

3.) Click the BlueTie account

4.) Click the Account Information button

5.) Click the Server Settings button

6.) Verify that Authentication is set to Password

7.) Verify that username and password are entered correctly

Microsoft Entourage

1.) Click Tools

2.) Click Accounts

3.) Click Mail

4.) Double-click on the BlueTie account

5.) Click Account Settings

6.) Click the Advanced Sending Options button

7.) Verify that “SMTP server requires authentication” is checked and “Use same settings as receiving mail server” is selected

8.) Close the window by clicking the box in upper-left corner

Qualcomm Eudora

1.) Click the Eudora menu

2.) Click Preferences

3.) Click the Checking Mail icon

4.) Verify that ‘Authentication’ is set to Passwords

5.) Click the Sending Mail icon

6.) Verify that Allow Authorization is checked

Click to rate this post!
[Total: 1 Average: 5]